Google Document: Dungeon Crawler Design Document
GitHub Repository: https://github.com/devpin95/DungeonCrawler
Contributors: Kevin MacFarlane, Devin Piner
Introduction
Index
- System
- Constributions (Blame)
- Testing
- Game Design
- Hardware Logic
- Software Logic
- Appendix A - System Breakdown
System
This is a 1-dimensional dungeon crawler game that utilizes a 5 meter long LED strip, and a unique controller. The strip consists of 300 individually addressable LEDs which are used to display the game state. The player can tilt the controller to move the player object on the strip, and he can flick/shake the controller to attack. It was inspired by two other projects: Line Wobbler and Twang (we made sure to ignore any code that we found on these examples, and build it completely from scratch).
The game consists of the player, two different enemy types, three different environment types, and a boss for the final level. We use different combinations of these objects to build our levels.
In this report we will discuss the individual contributions, how we tested the game, the game design, the hardware that we used and why we chose to use it, and the software implementation and why we designed it that way.
Contributions (Blame)
Devin Piner- Entity class design and implementation
- Game Piece implementation (Player, Enemy, Patroller, Lava, Wind, FlowingLava)
- Basic game-logic structure (Main Game Loop)
- JSON-to-array helper program (Memory management)
- System design (Entity pools, basic collision detection, levels implementation)
- BigBoi Boss design, basic logic and animation, and global variables access
Kevin MacFarlane
- Game logic and design
- Design and 3D-print the housing and other components
- Soldering longer wires to the LED strip
- Make an existing power supply work with the project
- Assembly of everything
- System design
- Level struct
- Gyroscope + Accelerometer detection and control
- General code tweaking and idea generation
- Presentation
Testing
As with any project, testing was an important task integrated throughout the process to ensure issues would be minimized as progress was made. We began by thoroughly designing systems before implementing them so that logic was well established and less likely to change. Through testing we were able to refine our ideas to handle issues in implementation and integration with other systems. Along with this, we took iterative steps in implementation and tested them to guarantee their functionality worked as intended. We repeated this process whenever a system did not meet our requirements or did not function in a satisfactory manner. For example, movement of the player via the accelerometer is an important function of our game. After our initial testing, we found it cumbersome and confusing. We tweaked our code and found a setting that felt more accurate and satisfying. The most notable ways that we tested the system were through trial and error, and by getting other people to play the game.
Trial and ErrorStarting from the beginning of this project, every time a new game mechanic, object, or hardware was introduced, we would test to make sure that it was working as expected. If something didn’t work, we slowly retraced our steps to see what the cause of the issue was.
PlaytestersWhen we were comfortable with a level, or how certain aspects of the game were working, we would get an external person to play the game. This allowed us to see if we needed to change anything in terms of understanding how to play, to make levels easier or harder, and if there were any unexpected bugs that arose. Using people other than us to test gave insight into what was intuitive for the player and what was something we overlooked. Many bugs were found and solved using this method.
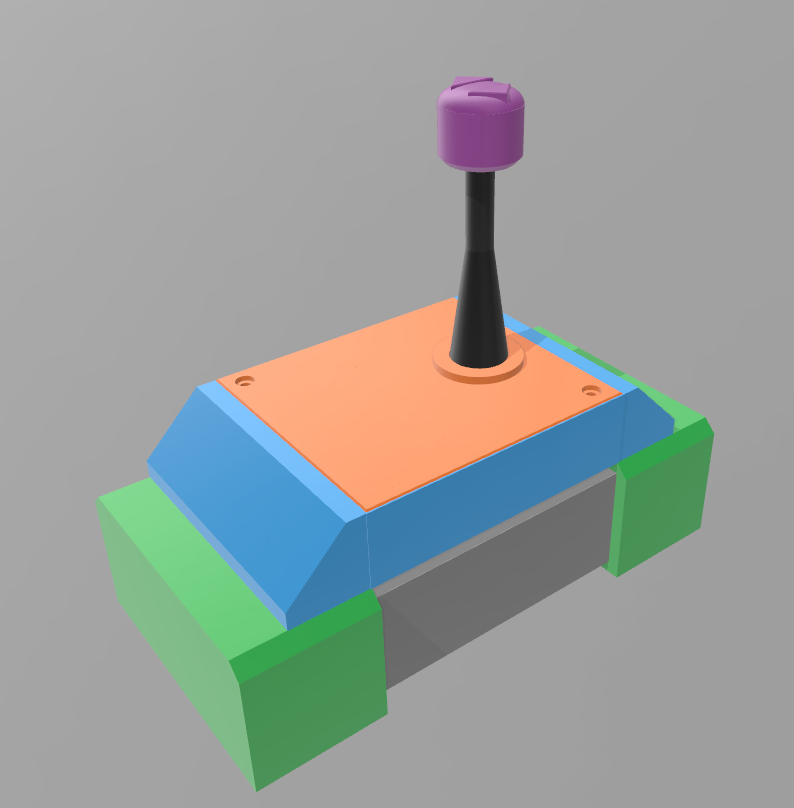
For images of the system please see Appendix A.
Game Design
The game has a player, two enemy types, three environment types, and a boss.
Player
The player has a length of one LED and is colored green. It has only two actions it can perform in the game: move and attack. We wanted to ensure that the player wasn’t overly complex to control, so the game is easy for people to learn.
MoveThe player can move forwards and backwards. There are 3 speeds that it can achieve depending on how far the player tilts the sensor.
AttackThe player can only initiate an attack when he is green. Being green indicates that the player is ready to attack. The player will attack in a range of 5 LEDs. To show that the player is attacking, we change the color of these LEDs to purple.
Initially, the player could keep attacking with no delay between attacks. After testing this, we found that levels became too easy. A reload mechanic was then added to the player. What this does is add a delay after the player has attacked. This prevents the player from attacking again until the delay is over.
Essentially what happens is the following sequence of events:- Player (single green LED) will attack
- 5 LEDs light up in purple at the player location (indicating an attack) for a short time
- The LEDs turn blank and reveal the player location again (a single purple LED)
- The player will not be able to attack while the LED is purple
- After a short delay, the player turns green again (indicating he is ready to attack)
Death
When the player dies, we needed to have a visual indication of the updated game state. We decided to make the player “explode” and spread green over 20 LEDs. This shows the player that he has just died and will need to restart the level.
Enemies
There are two main enemy types which are both red. Having slightly different enemies adds some variety in the game so that levels aren’t repetitive. All enemies can be killed by the player if the player hits them with an attack. If they move into the same space as the player (while the player is not attacking), then they will kill the player.
Standard EnemyThis enemy moves towards the player.
Patroller EnemyThis enemy moves back and forth over a set range.
Environment
There are currently three environment types in the game - Wind, Lava, and flowing Lava. Wind is blue while lava is orange. All of these are used to affect the player in some way while enemies will be unaffected.
WindWind is used to push the player in a certain direction. It won’t prevent them from moving back, but it will alter the players movement speed. If the player moves in the same direction that the wind is blowing, they will move faster than what is normal. If the player moves against the wind, they will move slower than normal.
LavaThe lava cycles between being active and inactive. If the lava is inactive, the player can move through it without dying. If the lava is active, then the player cannot move through it. If he does, he will die and will have to restart the level.
Flowing LavaThis lava type starts at the beginning of the board, just before the player. It progressively gets larger as time passes. This gives the player a sense of dread and urgency because, if they waste time initially, they will get hit by the lava and will have to restart the level.
Boss
The boss is red and white and is only activated in the final level. It has a similar movement to the patroller enemy type as it also moves back and forth over a set range. It is the only entity that uses health and designed to be the same length as its current health value (which initially starts at 10). This makes it easy for the player to see how much health it has left, and how many times he still needs to attack the boss.
The boss can shoot standard enemy units at the player. To show when the boss is able to shoot, it has 3 white LEDs in front of it. Whenever he shoots, one of these LEDs disappears. It will shoot 3 times before reloading.
When the player hits the boss, the boss loses 2 health. The boss will also instantly move to the other end of the board and will activates some environmental types to increase the difficulty for the player.
When the boss health is zero, then the player wins the level.
Hardware Logic
When designing the game, we knew that we needed some core components in order to get it operational. We also needed certain tools in order to make the game complete, easy to play and intuitive to use and setup/teardown.
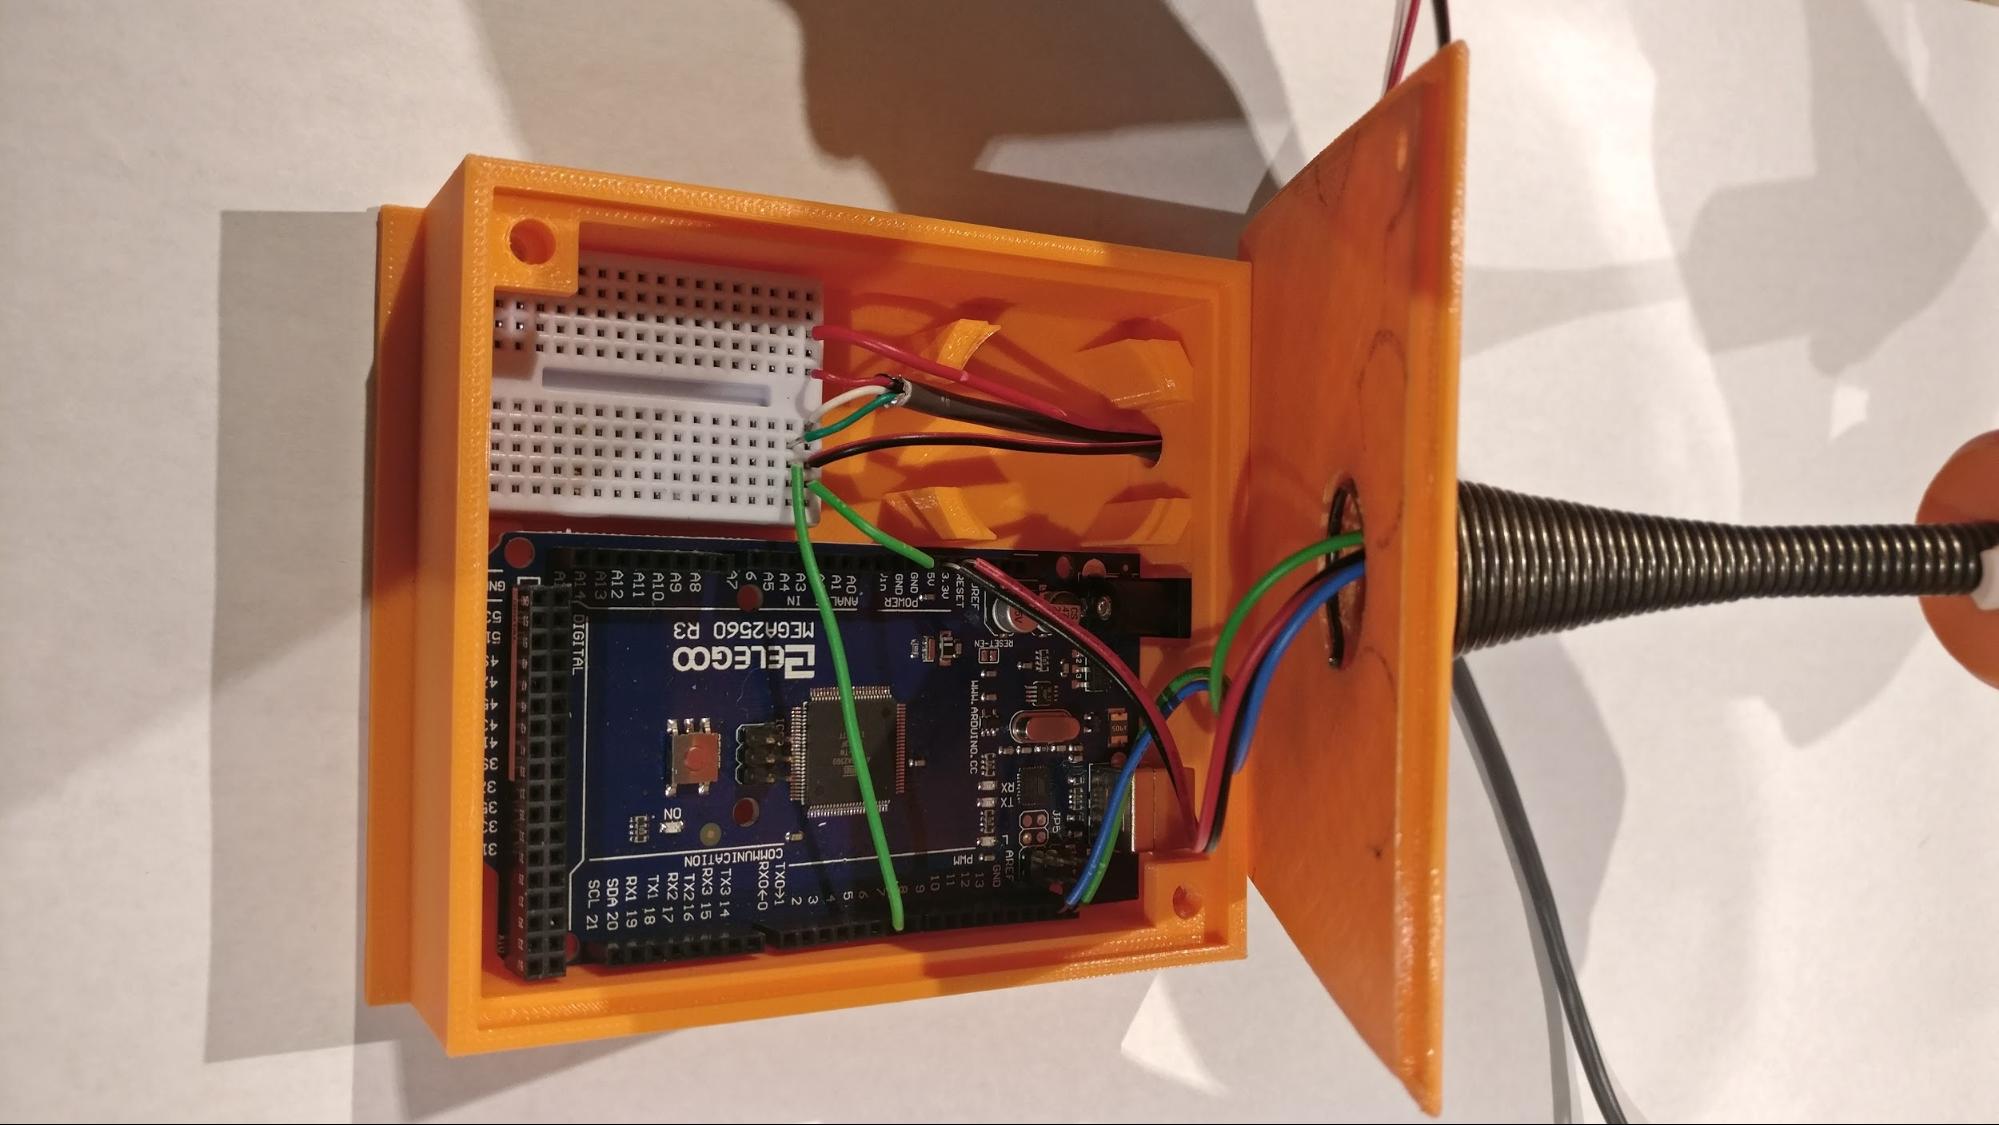
Core Components- Arduino Mega
- LED Strip (WS2812b 5m Individually Addressable Strip)
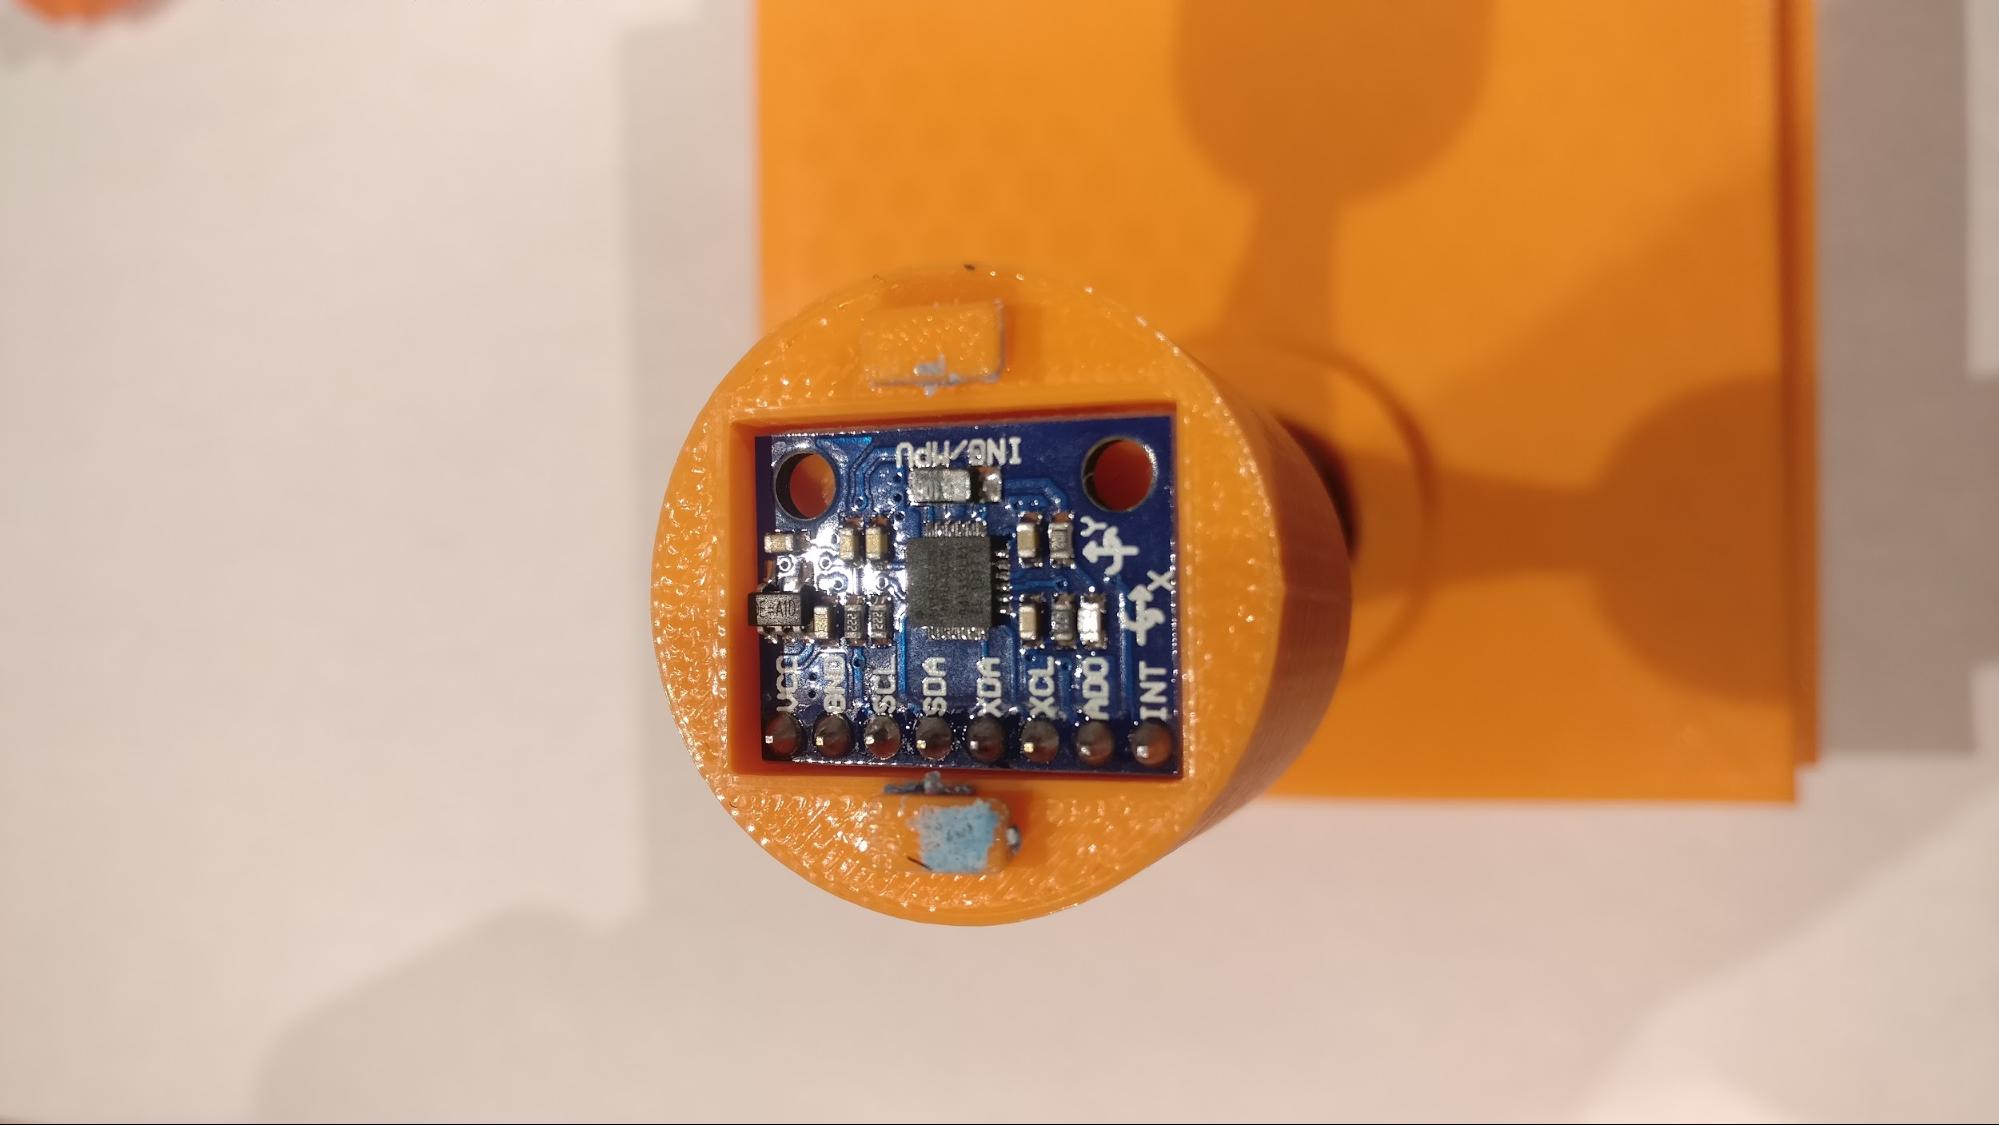
- MPU-6050 (GY-521) 3-Axis Accelerometer and Gyro
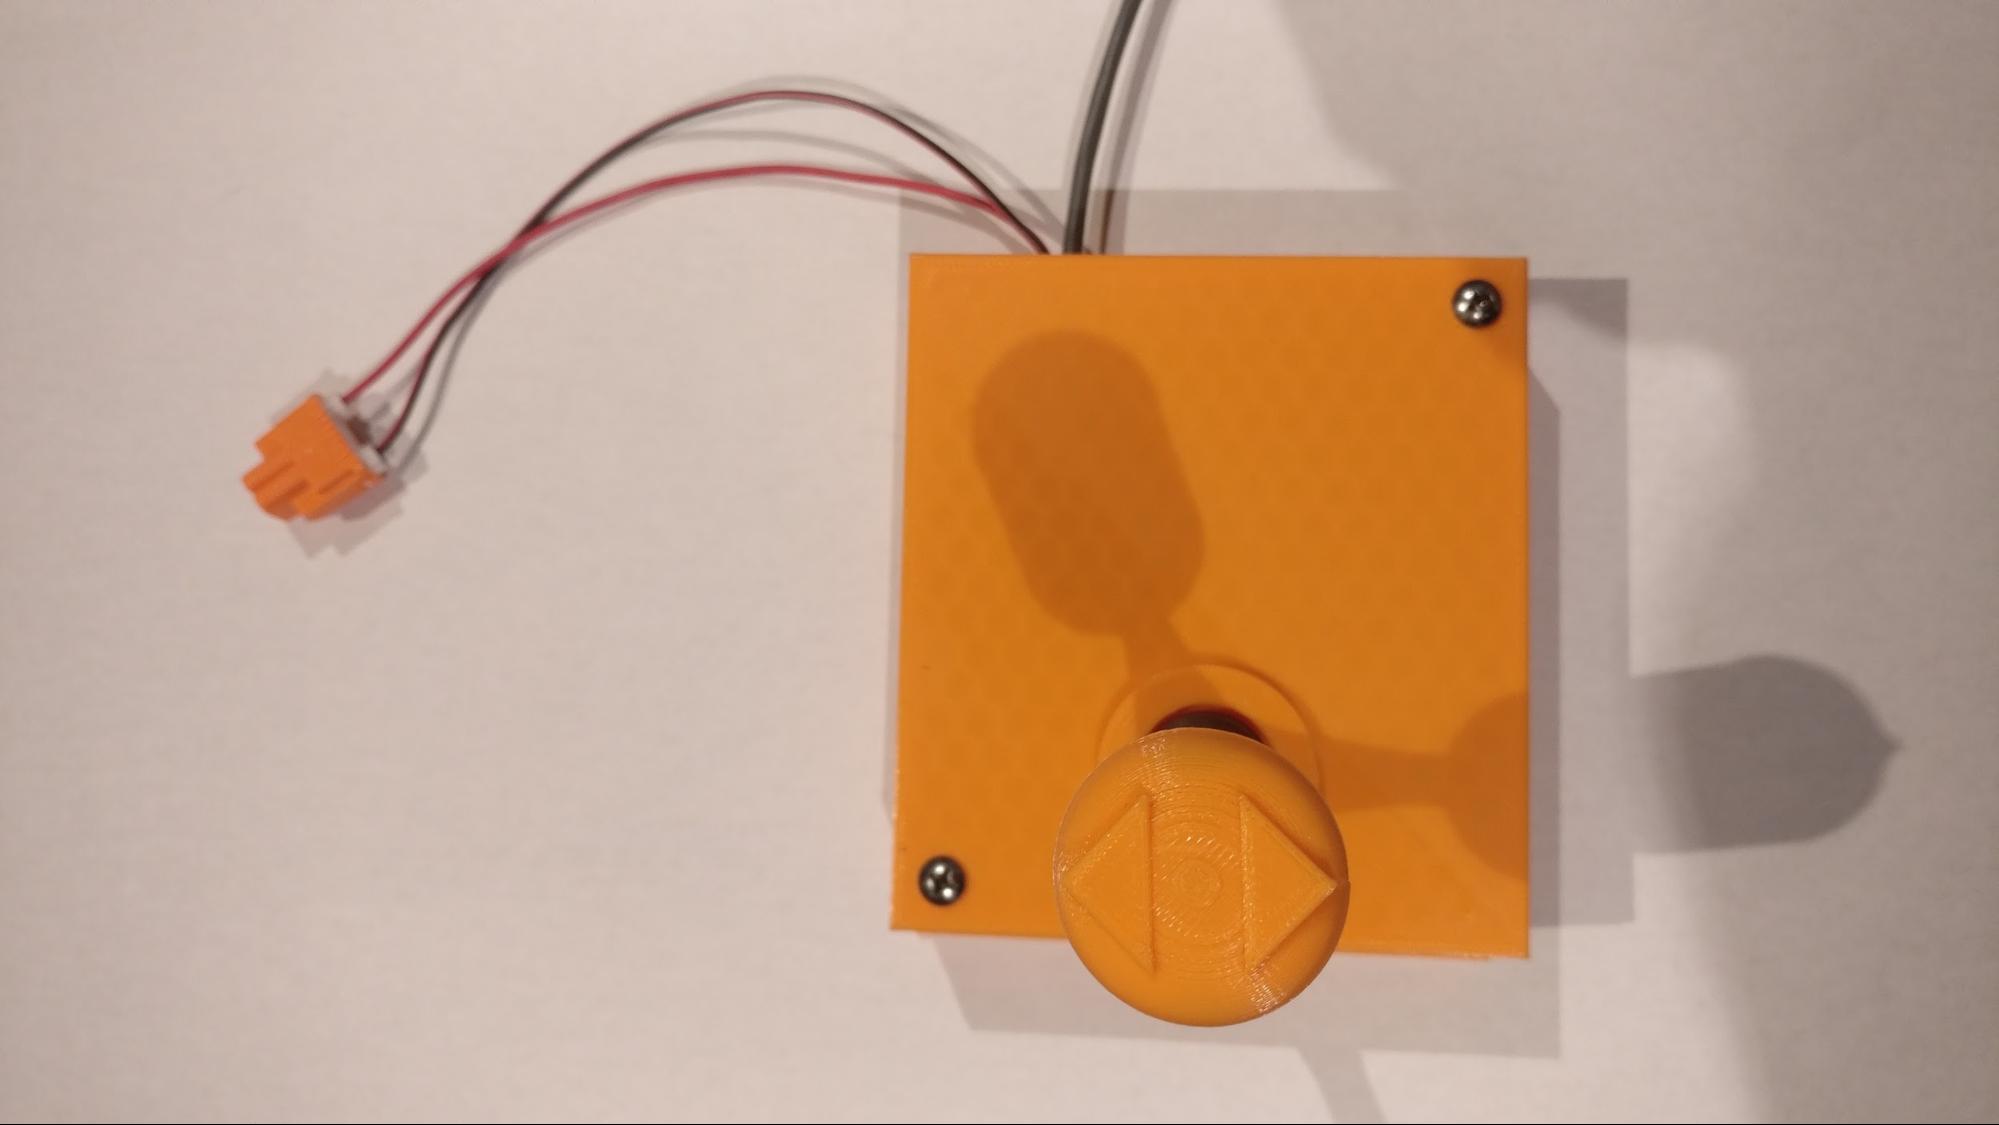
- Door Spring
- Power Supply
Tools and Extra Bits
- Soldering Iron
- Wire
- 3D Printer
We decided on the Arduino Mega because it has 256 kB of flash memory (compared to the 32kB of the Uno) and 8kB of SRAM (compared to the 2kB on the Uno). The fact that we have a few thousand lines of code, and that many objects are created and used in the various levels, we needed something with a bit more memory.
The LED strip needed to have individually addressable LEDs. This would allow for us to control exactly what we want to display and how we want to display it.
The MPU-6050 chip is used to control the movement and attacking of the player. We wanted something other than a joystick and buttons for movement and attacking. This is limiting int what we can do, but it makes learning the game easier.
The power supply is used to control the LED strip. It requires approximately 15 Amps if we wanted to have all the LEDs on at full white brightness. We are using a supply that give 2 Amps of current. Because we have a changing game state, and full control over level design, we will almost never have to fully power all the lights.
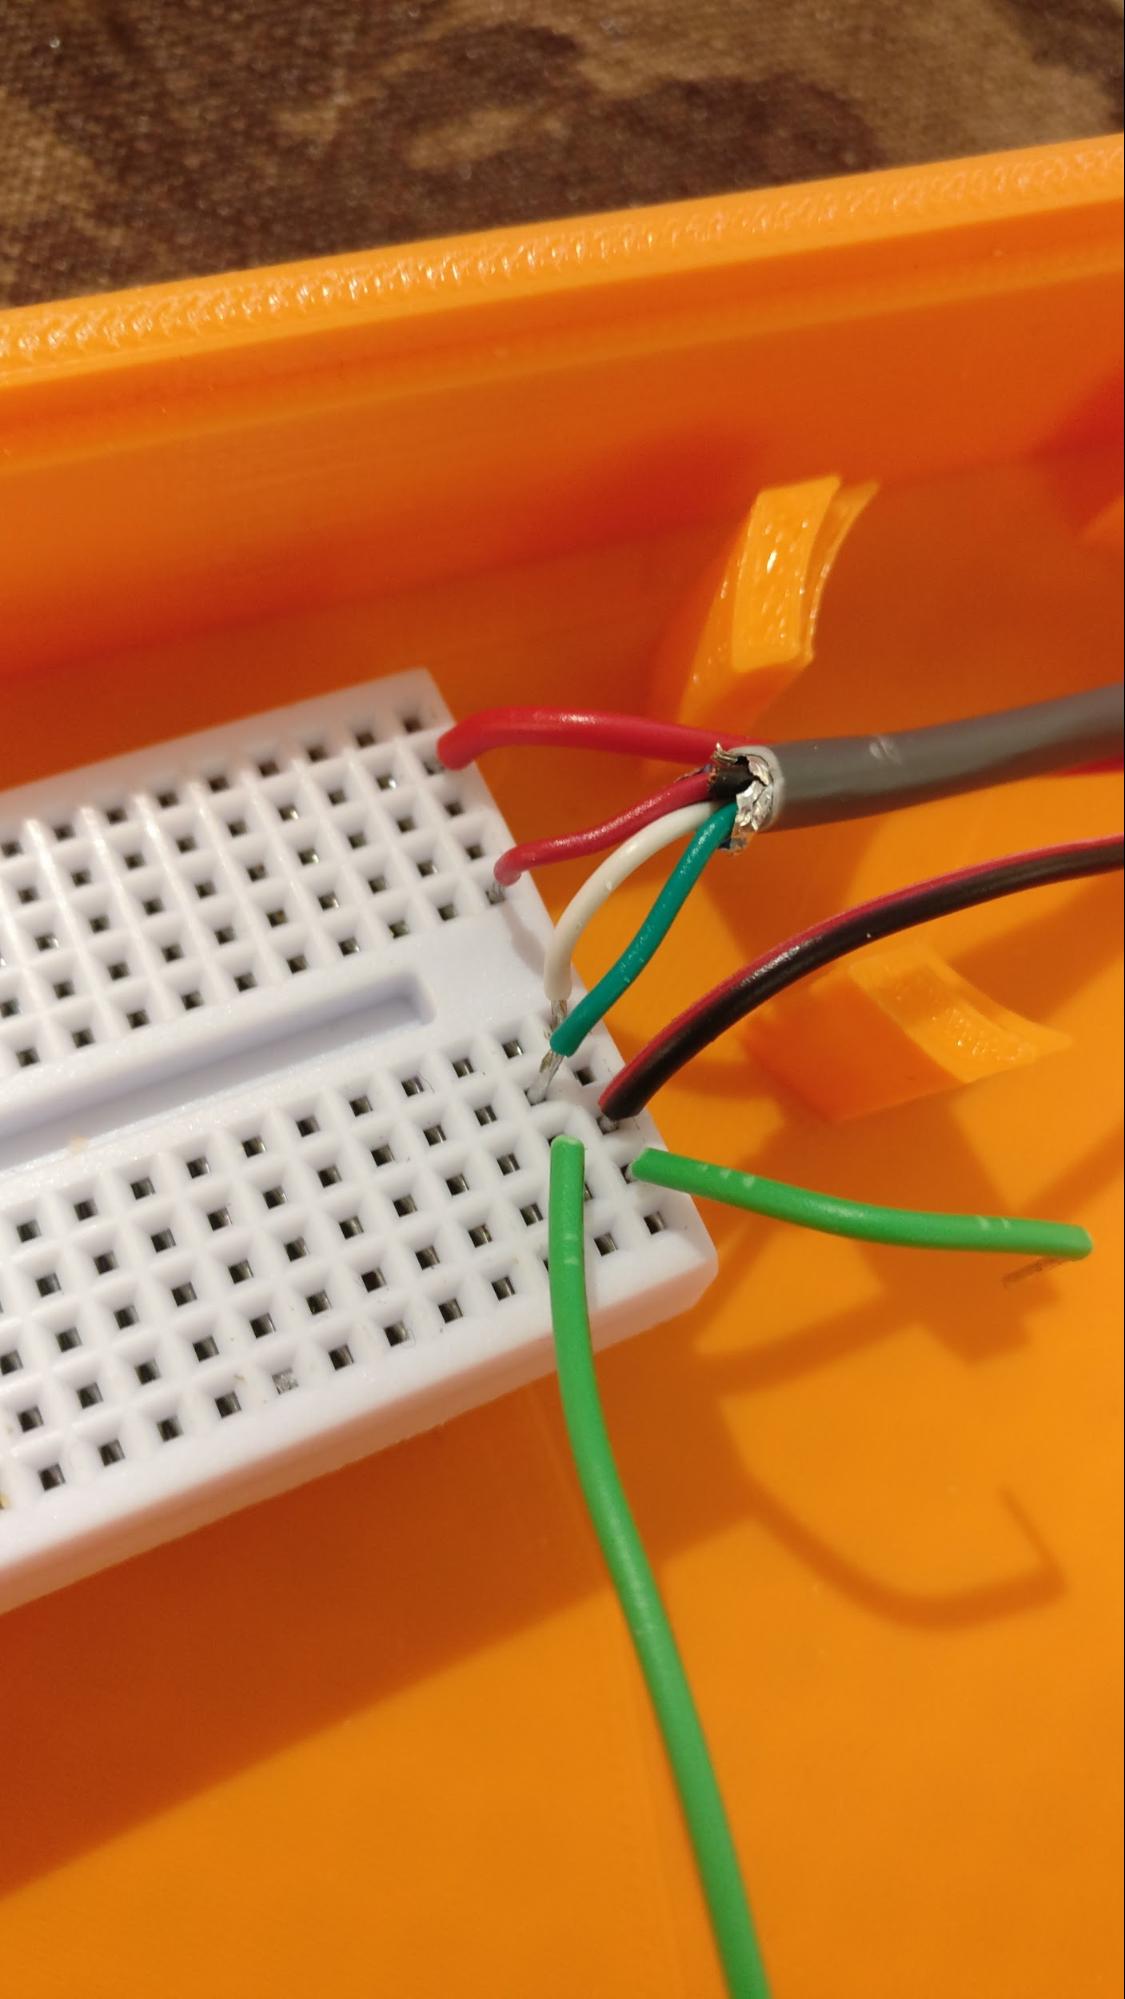
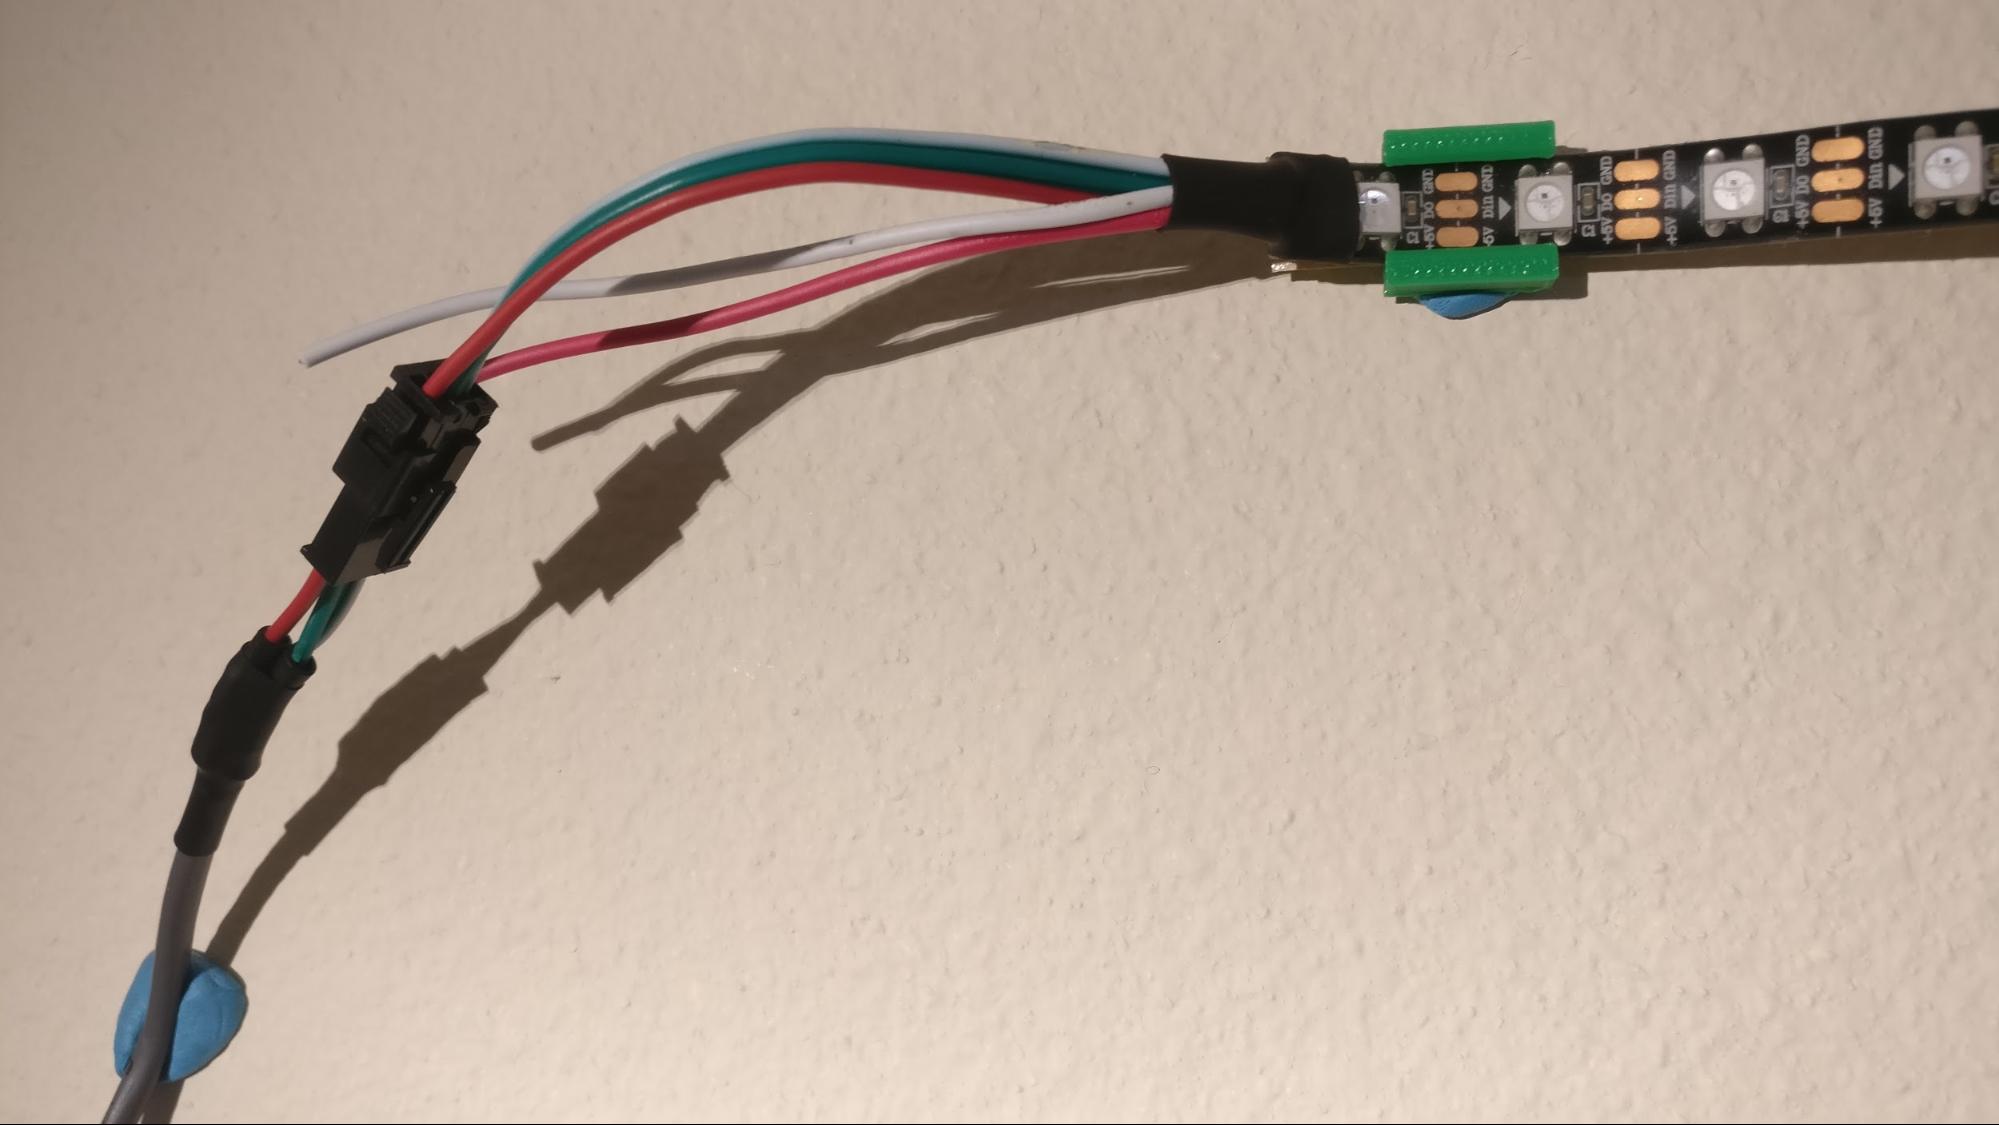
The LED strip that was delivered had short connection wires. We wanted something that could be set up at least 4 meters away. We had to cut and solder on some new wire so that the strip could be setup at a distance.
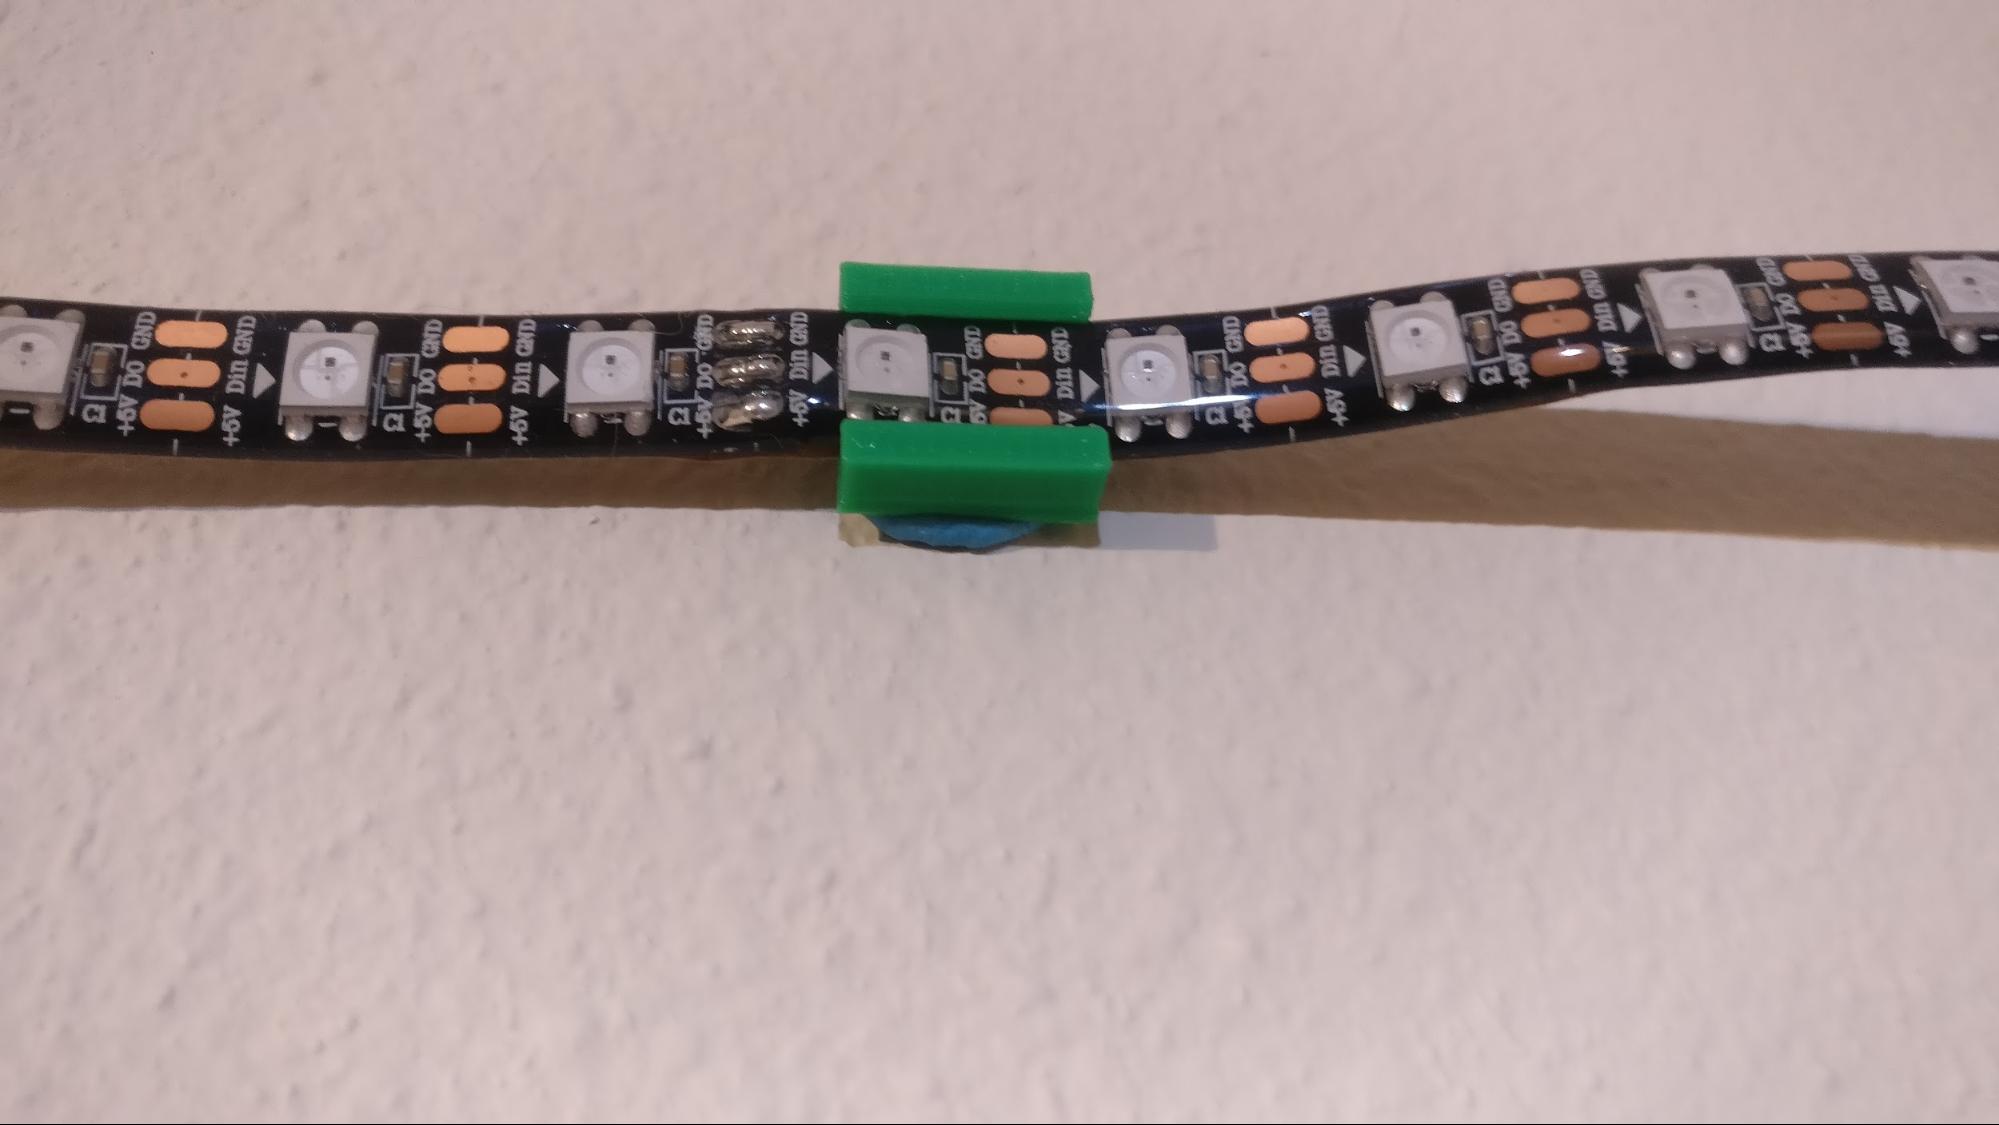
In order for the game to be easy for people to learn and play, everything had to be housed in a boxes and compartments of sorts. In order to customize the housing, we found 3D models online that would fit the Arduino Mega. We then modified these files and printed them on a 3D printer. We also made some 3D printed clips so we could stick the LED strip to the wall without covering any of the LEDs.
Software Logic
Here, we will describe the logic of the game so that we can get an idea of what will be happening in the code, like, how we will represent the LED strip or the player and the baddies.
Board
We will call the LED strip “Board”. The Board length will be the number of LEDs on the strip. Board[0] will represent the first LED, or the leftmost LED. Board[length] will represent the last LED, or the rightmost LED. The main purpose of the Board is to display the current frame - the position and color of each active game piece (the player, baddies). Interaction with the Board will be determined by the library used to interact with the LED strip - and array of integers may represent the LED position and it’s color may be set by some function in the library.
Main Game Loop
The Main Game Loop (MGL) will be where we coordinate all game pieces, get user input (the spring), and update the Board.
The MGL will update some number of times per second. We need to limit, or at least pre-determine, the FPS in order to control animation and positioning of the game pieces easily. We could uncap the fps but this might add complexity that we don’t want to handle. A fixed FPS will be more manageable in the short-term. The FPS method involves clearing the Board at the beginning of the loop, updating game pieces and executing game logic, then displaying the Board. We will refine this method later as features because more complex and require alternate methods of implementing the MGL to achieve.
Game Pieces
Game pieces will contain all data needed by the object it represents. Every game piece needs a position, rate of change to indicate motion, color or animation, and hitbox. The position is all of the LEDs that represent the object while the hitbox is the range of LEDs that the game will consider in it’s logic.
To logically represent an action, such as attacking, we toggle a boolean in the Player object. Whenever we update the game piece, we consider all possible states of the object and change its appearance as required. We can think of the game piece’s update function as a sub-game loop; it will iterate for each iteration of the MGL. To animate the piece, we simply need to keep track of the frame count from the start of the animation and change the color, position, or hitbox of the piece according to the count.
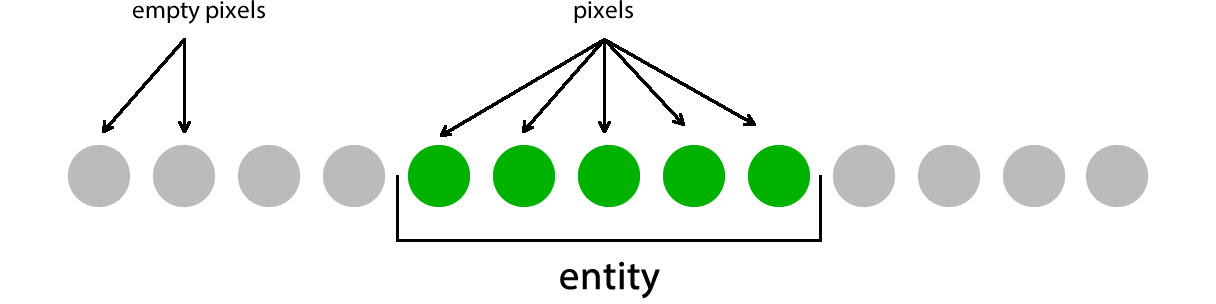
Entities
An Entity is the object representation of any game piece, controlling position, movement, and animations. It stores the information needed to translate the object to its physical appearance on the Board. We can say that each LED used by an object is one of it’s pixels. Figure 1 shows this idea. As we continue, we will present Entity concepts in the same manner.
We need some way of determining the position of an entity. In the simplest case, we can set an anchor point for the object, some point that is contained within the physical bounds of the object. For example, we can anchor the object on its leftmost pixel, using it to position the entity on the Board and as first index of an array defining the color of pixels, which we discuss next. We must define the anchor to be an index to the Board array of LEDs.

To define the physical appearance of an entity, we implement a fixed-size array, the first index is located at the anchor. Each entry of the array is a color object as defined by the Board object and indicates the intended color of a specific pixel. The index into the array is an offset from the anchor.
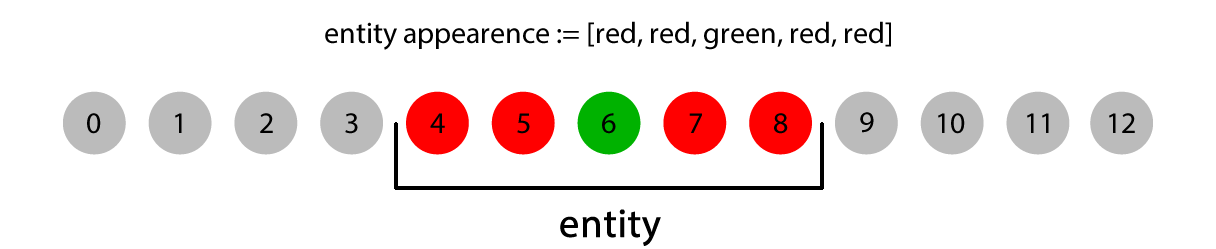
We can define bounds around the anchor to act as collision points. The left bound represents the leftmost point of the entity which can be collided with. The right bound represents the rightmost point of the entity which can be collided with. This means that we can calculate the position of the entity within the limits of the Board - the entity cannot move past the right edge of the Board any further than the right bound. The figures below show this.

We interpret Board collisions as follows. If the entity’s left boundary has the same index as the leftmost Board pixel, then the entity cannot move any further to the left. If the entity’s right boundary has the same index as the rightmose Board pixel, the entity cannot move further to the right

To translate movement of an entity to the Board, we assign to an entity a speed in pixels per unit of time. A positive speed results in movement to the right, a negative speed to the left. A stationary entity will have a speed of 0. The speed variable will be applied to the position of the entity’s anchor. For each iteration of the MGL, we receive input from the user, translate it to a speed, and update the Player entity’s anchor position, where doing so will update the position of the whole entity.

We can define entities to be a single pixel in size. Using the ideas of entities already discussed, we apply it to a single-pixel entity. The entity anchor, left bound, and right bound are all set to the same index of the Board.
Entity Implementations
All game pieces implemented for this project are classes derived from the Entity class, and have basic functions that allow for collision detection, removing pieces from the board, and basic positioning on the board. We will discuss further the logic needed to implement each type of Entity developed for this project.
Player (Implemented in Player.h and Player.cpp)As discussed in Game Design, the player is a simple Entity that only has two actions to perform: movement and attacking. Despite it’s trivial design, it’s implementation needed extra care when developing. Player is the user’s main interaction with the Board and must be made to do what the player expects, mainly move the way the user wants it to move and attack when the player wants to attack.
Movement requires the Player object include a variable to represent speed - the rate of change per frame. Every time the MGL updates Player, the Player’s speed is added to it’s anchor, and in turn updates all Entity values including left and right bounds and pixel indices. The speed variable is set in the MGL and is received from the user through a gyroscope (discussed in Hardware Logic) and ranges from -1 to 1.
Attacking is more complex than implementing movement because it requires timers to control the duration of an attack as well as manipulation of bounds and the anchor. To begin, the user input must signal an intention to attack (discussed in Hardware Logic). Once an attack is signalled, the Player calls the function startAttack(). This function alters the appearance of the Player by increasing its size to five pixels and changes the Player color to purple. Because the Player’s size is increased, instead of just adding four pixels to the right of the initial single-pixel state, we must add two pixels on the left and two pixels to the right of the starting pixel so that the Player grows in both directions - spreading from the Player center. To achieve this, we fake the effect. When the Player attacks, we increase the right bound to the specified length, in this case, five, so that the Player will be five pixels long while attacking. To make it appear as if the pixels spread out from the center, we shift the anchor back two positions and draw five pixels starting at that location. Once the attack duration is reached (determined by counting the number of frames from the start of the attack), we shift the anchor back to its original location and decrease the size and right bound location, and the effect is achieved.
Enemy (Implemented in Enemy.h and Enemy.cpp)The Enemy is the simplest Entity implemented in the base game. As discussed in Game Design, the main function of the Enemy is to travel along the Board in a single direction. Giving the Enemy a constant speed and updating it’s anchor for every loop of the MGL makes the Enemy march towards the Player until the player kills the Enemy or the Enemy kills the Player. Another feature added to Enemies is the ability to sleep. This effectively gives the Enemy a delay between level setup and when it appears on the Board and begins moving towards the player. This requires an extension to the base Entity draw function - in addition to not drawing dead Entities, an Enemy will not be drawn if it is sleeping. To ensure that an Enemy eventually wakes up and begins hunting the Player, a sleep interval is defined for each instance of an Enemy. Each time the Enemy is updated, a counter is incremented and once the counter reaches the previously defined sleep-interval, the Enemy wakes up and can now move.
Patroller (Implemented in Patroller.h and Patroller.cpp)The Patroller is the most unique Entity in that it’s speed is not constant - it travels in one direction, slows down, and travels the other way. We accomplish this by applying a simple sine function to a counter that indefinitely increases as well as other factors to control the position further. This function is defined as follows:
anchor = starting_position + ( sin( patrol * 0.01 * PATROL_SPEED ) * PATROL_DISTANCE );
Where we define starting_position to be the initial anchor, PATROL_SPEED is the speed at which to move from side-to-side, PATROL_DISTANCE is how far to travel in either direction and patrol is the indefinite counter.
To provide variety between multiple Patrollers in a single level, we provide an offset value which is added to the initial patrol value, effectively shifting the sine-wave cycle so that the Enemy begins the level at a different position other than its default starting position.
Lava (Implemented in Lava.h and Lava.cpp)Similar to the Patroller Entity, the Lava Entity uses a sine function to determine the on- and off-states. The function
sin(attacking_counter * 0.001 * LAVA_SPEED)
uses an indefinitely increasing counter attacking_counter and a variable LAVA_SPEED to control the rate of change. A characteristic of Lava we felt was needed to improve quality-of-life for the designing levels was to have variable length Lava Entities. We allow the designer to set the length of the Lava at level-setup by dynamically allocating arrays of pixels that represent the physical appearance of the Lava. To indicate that the Lava is in it’s on-state, we define the color of all pixels to be have a high brightness and when the Lava is in its off-state, we lower the brightness.
Flowing Lava (Implemented in FlowingLava.h and FlowingLava.cpp)We wanted to include another version of the Lava object that begins at the start of the Board and slowing flows across it. This was designed as flowing lava. Our initial implementation of Flowing Lava required an array of 300 pixels - enough to eventually fill the entire Board. We quickly discovered that this used too much dynamic memory (consider, a pixel object contains four integers, and 300 by 4, single-byte, integers results in 1200 bytes of dynamic memory). We retreated to a much simpler design containing only a single integer - the flowhead. This single integer represents the right-most bound of the growing lava. We leverage this along with the fact that the Flowing Lava starts at position zero and grows to the right to simply draw every pixel behind the flowhead as lava. If the Player ever goes beyond the flowhead, they are considered to be “inside” the lava, and are killed.
Wind (Implemented in Wind.h and Wind.cpp)Wind is another unique Entity in that it does not kill the Player upon collision. Instead it alters the Player’s speed so that it “pushes” it to the left or to the right. This is implemented by simply having a multiplier within the Wind Entity, that upon detection a collision with the Player, increases or decreases the Player speed by some constant amount.
Another interesting aspect of Wind is the animation needed to indicate the direction the wind is blowing. We start by giving each pixel a decreasing RGB value. Each time the Wind is updated, we shift each pixel to the left or to the right depending on the direction. This gives the illusion of movement within a confined number of pixels. As implemented, each Wind Entity is fixed to 20 pixels in length.
BigBoi - Boss (Implemented in BigBoi.h and BigBoi.cpp)Level final level of the dungeon crawler features our boss-type enemy, affectionately named BigBoi. The main challenge in implementing BigBoi is allowing him to alter the environment as the fight progresses. We needed BigBoi to add elements to the board as his health reached certain points. For example, after hitting BigBoi once, he teleports to the other side of the board and spawns a single Lava entity in the center of the Board. To do this, we needed to grant BigBoi access to the pools of Entities. These pools are defined as globally-scoped arrays, and we get them in to the BigBoi class using the following code
extern Level levels[NUMLEVELS];
extern Enemy enemy[POOL_NUM_ENEMIES];
extern Patroller patroller[POOL_NUM_PATROLLERS];
extern Lava lava[POOL_NUM_LAVA];
extern Wind wind[POOL_NUM_WIND];
This allows us to define the pools of entities in a separate file, then access those same pools in BigBoi.cpp without making copies of the arrays.
Now that BigBoi can alter the pool of Entities, we can make him shoot enemies at the player and manipulate the environment by adding wind, and both regular and flowing Lava. To remove the burden of setting up each Entity as he needs them, we need to develop a system for easily setting up the enemies needed for a given level. We discuss this next
Levels
We define a Level as a set of Entities and their assigned initial values given to them at the beginning of a given iteration of the MGL. The main goal of a Level is to easily design a set of challenges which the user must complete in order to continue through the dungeon. This required an alteration to the MGL described above as well as extra information to represent the data needed for a Level.
Main Game Loop RevisedIn order to support multiple Levels within the dungeon crawler, need to incorporate the concept of progression into the MGL - we need to be able to change Levels once the player has completed one or to restart the current Level if they failed to complete it. The current version of the MGL contains the logic needed for a single level (clearing the board, checking for collisions, etc.). We extend the MGL to handle an array of Levels and tests when it needs to continue. The figure below shows this extension as nested loops performing the needed functions.
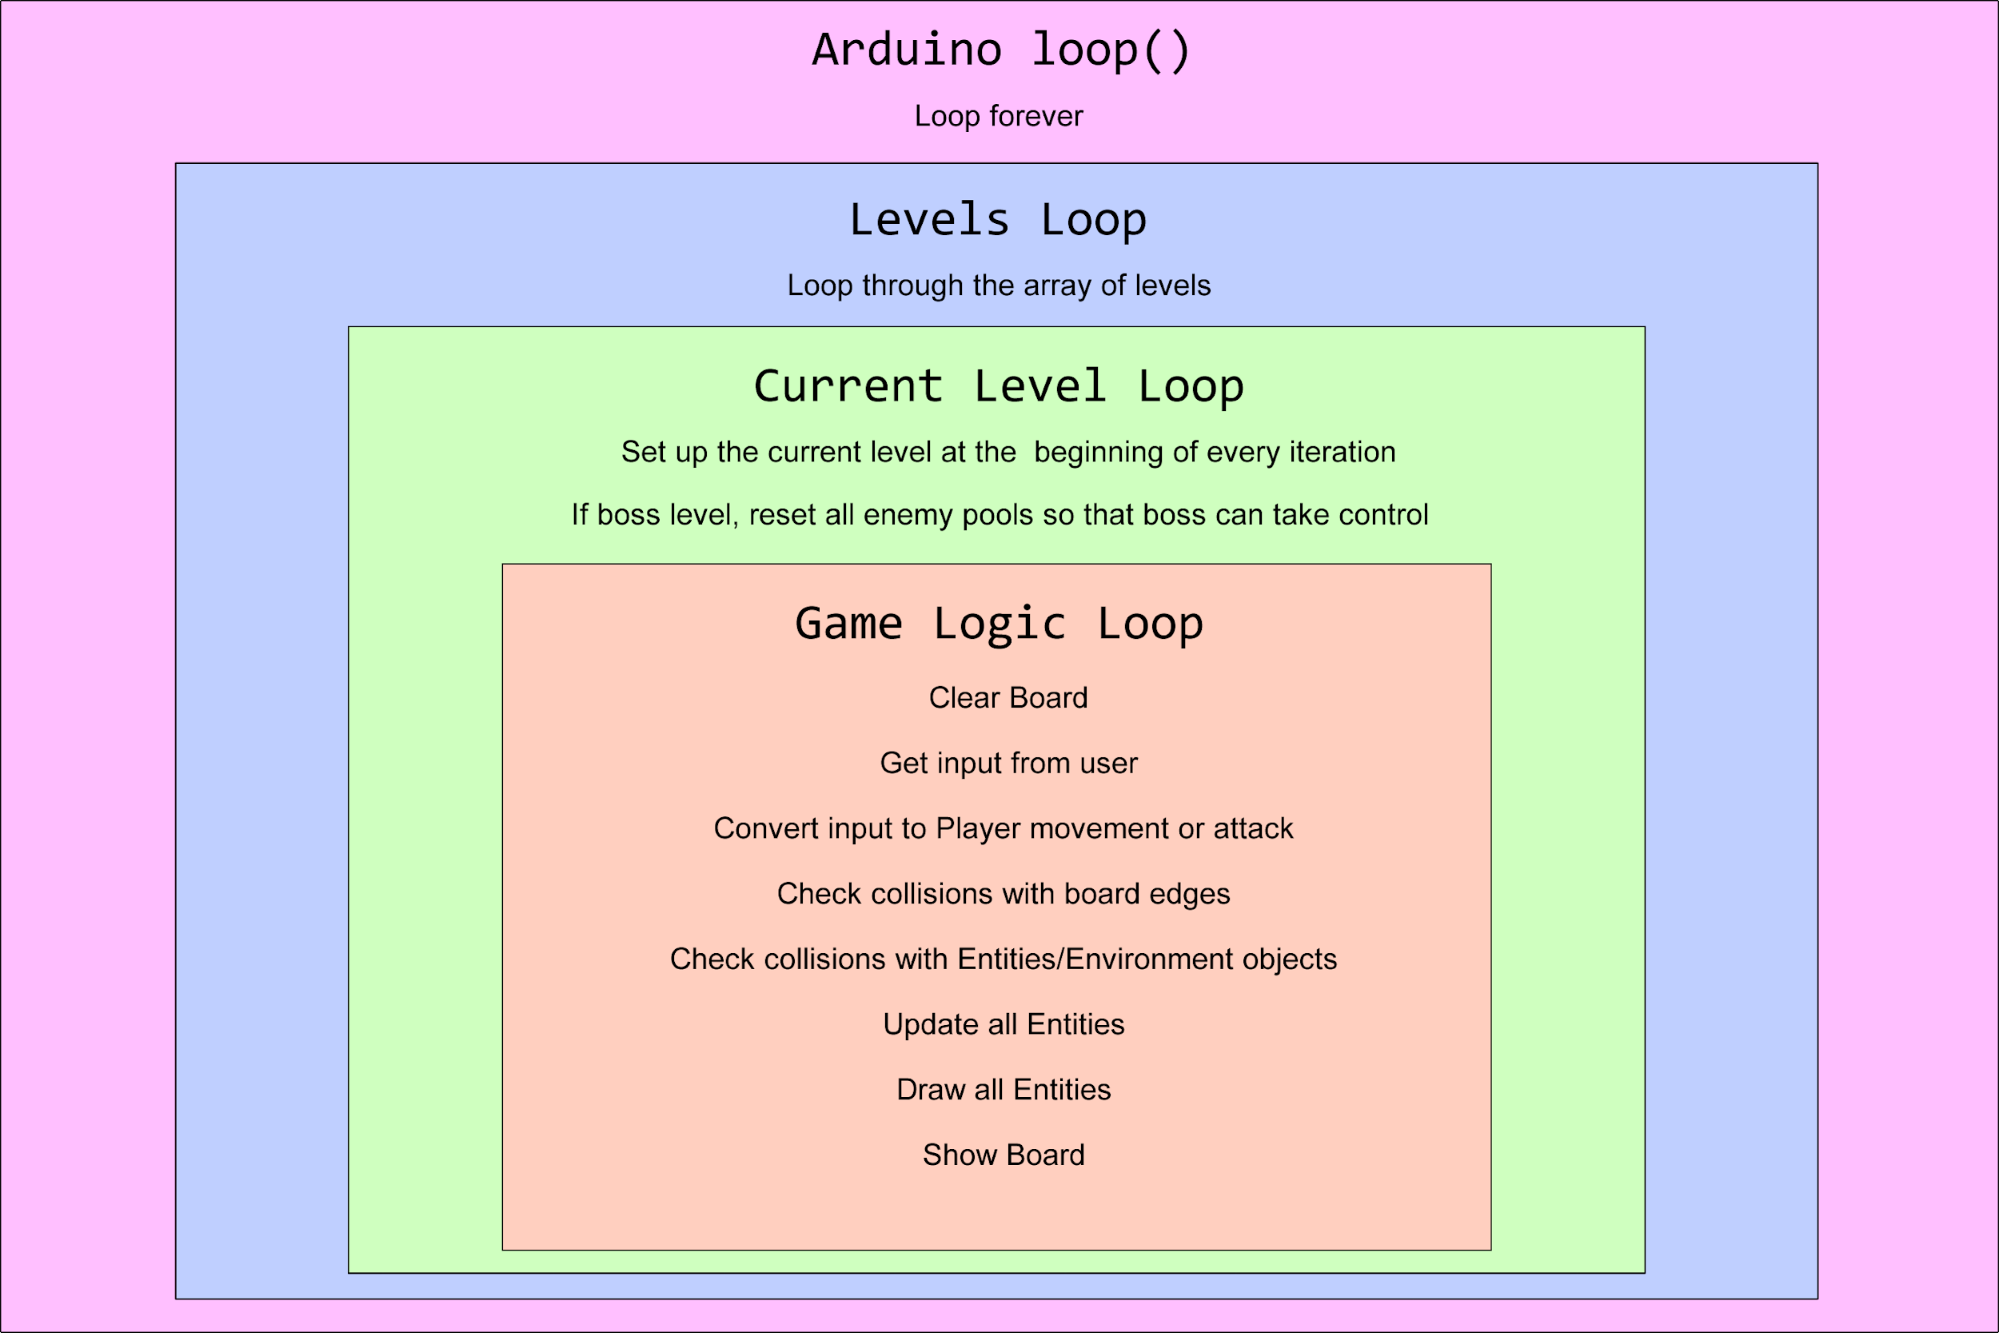
- Arduino
loop()Loops indefinitely and acts to keep the game running as long as the system is powered on. - Levels Loop Iterates through an a array of Level objects that contain the information needed for a given level
- Current Level Loop A feedback loop that reacts to the failure or success of the user in the current level; upon failure, the loops resets the current Level, if the user succeeds, the loop falls through to Levels Loop to proceed to the next Level. For the in which BigBoi resides, this loop also acts to reset the Entity pools so that he may interact with them correctly.
- Game Logic Loop Performs all logic needed to play the Level, like erasing the Board at the beginning of every loop, getting input from the hardware, updating the player speed, checking for collisions between the Player and Entities/Board, updating and drawing the Player and Entity pools, and showing the Board. The Game Logic Loop falls through to Current Level Loop when the Player either dies or completes the Level. The program spends the majority of its time executing this loop.
Level Structure (defined in Level.h)
The Level Structure stores all of the information needed for the Current Level Loop to set up the Level at the beginning of each iteration. The basic data stored in the Level Structure are the values to initialize and position the desired Entities. We define the values stored in the level structure:
- Player
- Flowing Lava
- A flag indicating if the level needs a FlowingLava Entity (boolean)
- Enemies
- The number of desired Enemy Entities (integer)
- Enemy starting positions (integer array)
- Enemy delays (integer array)
- Patrollers
- The number of desired Patroller Entities (integer)
- The number of desired Patroller Entities (integer)
- Patroller offsets (integer array)
- Lava
- The number of desired Lava Entities (integer)
- Lava starting positions (integer array)
- Lava lengths (integer array)
- Lava delays (integer array)
- Wind
- The number of desired Wind Entities (integer)
- Wind starting positions (integer array)
- Wind direction (integer array)
-
Player starting position (integer)
We compile an array (defined in levelInfo.h) of these Level objects over which the Levels Loop iterates and which the Current Level Loop sets up every loop. We note that the desired number of each Entity, n, indicates that the level will require the first n Entities of that type from the Entity pools. We define the pools as globally-defined arrays:
Enemy enemy[POOL_NUM_ENEMIES]
Patroller patroller[POOL_NUM_PATROLLERS]
Lava lava[POOL_NUM_LAVA]
Wind wind[POOL_NUM_WIND]
where we define the size of each pool in globals.h,
const int POOL_NUM_ENEMIES = 10;
const int POOL_NUM_PATROLLERS = 10;
const int POOL_NUM_LAVA = 5;
const int POOL_NUM_WIND = 5;
and define single object for the FlowingLava and BigBoi Entities
FlowingLava flowinglava;
BigBoi bigboi;
We create pre-initialized array so that we can manage the amount of memory used by Entity pools as well as easing the burden of managing the arrays themselves. We initially planned on arrays of pointers to each Entity type and dynamically allocate Entities as they are needed but decided allocating the arrays at compile-time would be easier to manage in the long-run.
With this system of a Level Structure array and Entity pools, setting up a Level (or restarting a Level when the Player dies) simply requires accessing the Level Structure array and updating every Entity back to their initial state. However, we still have one more problem to solve regarding the Level Structure array - the code needed to represent this system is shown below:
Level levels[NUMLEVELS] =
{
    {10, false, 4, {250, 250, 250, 250}, {0, 50, 100, 150}, 0, {0}, {0}, 0, {0}, {0}, {0}, 0, {0}, {0}},
    {10, false, 8, {250, 250, 250, 250, 250, 250, 250, 250}, {0, 10, 20, 30, 110, 120, 130, 140}, 0, {0}, {0}, 0, {0}, {0}, {0}, 0, {0}, {0}},
    {10, false, 6, {200, 250, 200, 250, 200, 250}, {0, 0, 50, 50, 100, 100}, 2, {50, 120}, {0, 100}, 0, {0}, {0}, {0}, 0, {0}, {0}},
    {10, false, 2, {250, 280}, {0, 0}, 4, {20, 50, 150, 180}, {0, 50, 100, 150}, 0, {0}, {0}, {0}, 2, {125, 145}, {1, 1}},
    {10, true, 10, {280, 280, 280, 280, 280, 280, 280, 280, 280, 280}, {0, 20, 70, 90, 140, 160, 210, 230, 280, 300}, 0, {0}, {0}, 0, {0}, {0}, {0}, 4, {40, 100, 160, 220}, {-1, -1, -1, -1}},
    {10, false, 0, {0}, {0}, 6, {30, 80, 130, 180, 230, 280}, {0, 10, 20, 30, 40, 50}, 3, {20, 120, 220}, {40, 40, 40}, {0, 50, 100}, 0, {0}, {0}},
    {15, false, 9, {100, 100, 100, 220, 220, 220, 200, 200, 200}, {0, 10, 20, 100, 110, 120, 150, 160, 170}, 0, {0}, {0}, 4, {0, 100, 130, 160}, {10, 10, 30, 30}, {0, 100, 100, 200}, 1, {110}, {1}},
    {10, false, 6, {250, 250, 250, 250, 250, 250}, {0, 15, 30, 100, 115, 130}, 3, {15, 125, 220}, {0, 0, 0}, 5, {50, 80, 110, 140, 170}, {30, 30, 30, 30, 30}, {0, 80, 0, 80, 0}, 2, {30, 200}, {1, -1}},
    {10, false, 6, {250, 250, 250, 250, 250, 250}, {0, 20, 40, 100, 120, 140}, 10, {125, 130, 135, 140, 145, 150, 155, 160, 165, 175}, {0, 50, 100, 150, 200, 250, 300, 350, 400, 450}, 2, {110, 180}, {10, 10}, {0, 0}, 0, {0}, {0}},
    {10, false, 3, {250, 250, 250}, {0, 0, 0}, 0, {0}, {0}, 3, {130, 90, 190}, {20, 20, 20}, {0, 200, 200}, 2, {110, 170}, {1, -1}}
};
We hope that the issue is clear - this array represents only 10 levels. If we wanted to include any more levels, this array would be even more unmanageable than it already is. We needed a develop a more human-readable format to represent this information; we use JSON to make it easier to manage.
The decision to design Level layouts using JSON was one made simply by familiarity with the format and availability of C++ libraries to handle JSON itself. In the future, this may be a point of reconsideration. For now, however, it fits our needs.
Using JSON allows us to represent every Level as a simple string, from which we use a third-party C++ JSON parser to convert the string into an accessible object. The following statement is an example of how we can access the Player starting position for the third Level
Json["levels"][2]["ppos"]
It becomes clear why JSON is a more readable and manageable format over a plain integer array. However, this presents another, arguably simpler, issue regarding memory. If we store the JSON as a string within the project, it is quickly apparent that there is not enough memory on the Arduino Mega - we remember that a single character takes an entire byte to represent, and a JSON string can easily reach thousands of characters in length. This quickly consumes all of the remaining dynamic memory on the Arduino. The simple solution to this is to create a separate helper-program that converts the easy-to-access JSON into the array format presented above. Since we do not need to access the array directly, as it is simply an array of initializer lists for Level structures, this is an acceptable solution that frees up dynamic memory and allows for easy development of levels. This helper-program, called jsonConverter, is stored in the subdirectory, JsonToArray, within the Github repository.
Appendix A - System Breakdown
 BACK TO HARDWARE
 BACK TO TOP